Search
Random Recipe
Cottage Pie and stir fried Veg

After yesterday’s Cottage Pie-Pie we had a good amount of Cottage Pie filling left, but no “Cottage” on it. Mashed Spud as most would call it….
So the second meal out of a 500g pack of mince from the reductions fridge at £2 with some mashed Potatoes and grated Cheese over the top made a pretty good Cottage Pie. A bit of stir fried Veg and we’re all fuelled up!
Cottage Pie is a regular gig here if we have a bit of mince. Our general recipe is here, but play with it and be inventive. Just don’t slice Kiwi fruit over the top!
On Facebook
- Details
- Written by Tony Carson
- Category: Recipes

We sometimes end up with vegetables in the fridge with are in all honestly well beyond passing on. Some of the stores I collect from for the Food Bank are a bit sneaky and dump things in the bags which are well on their way to the next life!
The foundation of this was a really battered looking Cauliflower.
Ingredients:-
300g of Cauliflower florets
150g Green Beans, chopped
250g of Shallots, peeled & quartered
75g of Salt
4 Tbsp of Cornflour
75g of Sugar
1 Tsp of Turmeric
1 Tbsp of Mustard Powder
1 Tsp of Ground Ginger
500ml of Spirit Vinegar
250g of Cucumber, deseeded & sliced
Method:-
(1) Place the Vegetables in a bowl and mix in the Salt.
(2) Cover and allow to stand for 24 hours.
(3) Rinse and drain, allowing to dry.
(4) Mix the Cornflour, Mustard Powder, Sugar, Turmeric, Ginger and a little of the Vinegar.
(5) Combine into a smooth paste.
(6) Add to a pan over a low heat and gradually stir in the remaining Vinegar.
(7) Cook over a low heat until the mixture thickens.
(8) add the Vegetables and cook over a low heat for 2 to 3 minutes.
(9) Allow to cool and then add to jars.
(10) Allow to cure for 3 to 4 weeks.
We tried a bit last night and although it’s not had the 3 to 4 weeks to cure yet, it tastes remarkably good and certainly better than the store bought versions.


- Details
- Written by Tony Carson
- Category: Recipes

As Milk products have now become a problem for Sue, we’re re-inventing some of our favourite Gluten Free recipes. This was quite an easy fix and it worked really well.
Ingredients:-
2 Chicken Breasts
2 Tbsp of Garlic Butter, with additional dried Herbs - To add colour
Gluten & Dairy Free Breadcrumbs to coat, seasoned with Spices of your choice
1 Egg beaten
2 Tbsp of Cornflour
Method:-
(1) Make a pocket in the Chicken Breast.
(2) Spoon the Garlic Butter into the pocket.
(3) Smother the outside of the breast with the excess Garlic Butter.
(4) Coat with the Cornflour.
(5) Dip in the Egg and then roll to coat in the Breadcrumbs.
(6) Place in the fridge for 20 minutes to firm.
(7) Cook in a pre-heated oven at 180c for 20 to 30 minutes.
We used our home Lacto fermented Garlic which has been ageing in the cupboard for a few months. Also Olive Spread to replace the Butter. It really packs a punch now…..
- Details
- Written by Tony Carson
- Category: Recipes
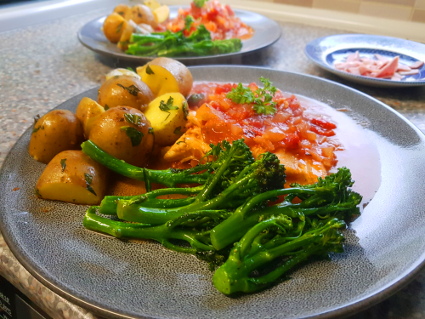
Quite easy and very tasty…..
Ingredients:-
2 Discounted Cod for-end fillets
1 Tin of chopped Tomatoes & ½ a Tin of water
1 Onion, Diced
2 Cloves of Garlic, minced
1 Tsp of dried Thyme
1 Tbsp of Soy Sauce ( Gluten free for us)
Ground Black Pepper, to season
1 Tsp of Brown Sugar
A knob of Margarine and Oil to fry
Method:-
(1) Heat the Oil & Margarine in a pan.
(2) Add the Onions and fry until softened.
(3) Add the Garlic and fry for a further 2 minutes.
(4) Season with Ground Pepper and stir in the Tomatoes, Sugar, Soy Sauce and dried Thyme.
(5) Bring everything to the boil and then reduce the heat to a simmer.
(6) Simmer for 5 minutes.
(7) Add the Cod to the Sauce.
(8) Cover and simmer on a very low heat for 10 minutes.
(9) When the Fish is cooked and flakes easily, you are ready to serve.
We served ours with the Fish on a bed of the sauce, the remained spooned over, Broccoli and Minted New Potatoes. I was rather good…...
- Details
- Written by Tony Carson
- Category: Recipes

Gluten free bread is more like chemistry than baking to get it right. Gluten and Daily free Bread feels like you’ve actually lost the plot and are messing with the Occult / Alchemy.
But it worked. We’ll need to adjust the recipe slightly for our taste. More Salt and slightly less Honey next time. But the slightly sweet overall taste worked really well for Prawn Toast. Certainly the best version we’ve ever eating at home or in a restaurant.
Prawn Toast.
Ingredients:-
150g of Raw Prawns
1 Tsp of Ginger, grated
2 Cloves of Garlic, minced
1 Egg White
2 Spring Onions, chopped
1 Tsp of Soy Sauce (Gluten free for us)
¼ Tsp of ground White Pepper
¼ Tsp of Salt
3 Slices of Gluten free White Bread, cut into triangles (Gluten free for us – See recipe below)
6 Tbsp of Sesame Seeds
Oil to fry
Method:-
(1) Add the Prawns, Ginger, Garlic, Egg White, Spring Onions, Soy Sauce, Salt, white Pepper together and blitz to a smooth paste.
(2) Spread the paste generously on one side of the Bread.
(3) Dip each triangle of bread in the Sesame Seeds, paste side down.
(4) Heart Oil and fry paste side up for 1 to 2 minutes.
(5) Flip over and fry until the paste is golden brown.
(6) Drain of kitchen paper.
The flavour enhances as they cook, so these are probably best served at room temperature as a side. They were really good. Certainly a recipe we will repeat next time we do an Asian dish.
For the Gluten free / Milk free Bread:-
Ingredients:-
335Ml of Almond Milk, unsweetened
35g of Dairy free Margarine
2 Eggs, beaten
1 Tsp of Apple Cider Vinegar
400g of Plain Flour (Gluten free here)
120ml of liquid Honey
1 Tsp of Salt
1 ½ Tsp of Xanthan Gum
1 ¾ Tsp of Instant Yeast
Method:-
(1) Add all the wet ingredients to your Bread machine.
(2) Add all the dry ingredients excluding the Yeast.
(3) Make a small well in the top and add the Yeast.
(4) Bake on the Gluten free setting (It’s No.9 on our machine)
(5) Remove and allow to cool on a wire rack.
- Details
- Written by Tony Carson
- Category: Recipes

The Yellow Sticker fridge was kind to us the other day with two butterflied Mackerel at £1.79 They deserved a decent recipe…..
Ingredients:-
2 Butterflied Mackerel
4 Tbsp of Teriyaki
3 Tbsp of Mayonnaise
¼ Tsp of Wasabi Paste
½ Lemon , Juiced
2 Tbsp of White Rice Vinegar
4 Medium Potatoes, Peeled, boiled and mashed
A dash of Gluten Free Milk
A Knob of Dairy free Margarine
Diced Kale, deep fried to garnish
Sesame Seeds to garnish
Oil to fry
Method:-
(1) Pour the Teriyaki over the Mackerel and turn to evenly coat.
(2) Place in the fridge for at least 20 minutes.
(3) Boil and mashed the Potatoes with the Milk and Margarine.
(4) Mix the Wasabi Paste, Lemon Juice, Vinegar and Mayonnaise.
(5) Heat Oil in a griddle pan over a high heat.
(6) Add the fish to the pan skin side down and fry for 3 to 4 minutes.
(7) Flip the fish over, turning the heat down to medium.
(8) Cook over a medium heat for a further 3 to 4 minutes.
(9) Fry the Kale until crispy.
(10) Serve the Mackerel over a bed to mashed Potatoes.
(11) Spoon of the Wasabi Mayonnaise.
(12) Garnish with the Kale and Sesame Seeds.
This was a really good combination. However if you are making the Wasabi Mayonnaise with real Wasabi paste from a Chinese Supermarket, go steady….
Social Links
Translate
Latest Recipes
Latest News
- Why do we do what we do?
- When you find the ships cat on the helm
- We're a month old!
- Universal Credit & Employment Agencies!
- UN Report on Poverty in the UK November 2018
- The Veg Box
- The rollout of Universal Credit will be delayed until 2023
- Petition the Government to fix Universal Credit
- Honesty from a Politician? Not really, but it's a start.
- Homeless - Trapped - Homeless again - This can't be right?
© 2026 Eat Well on UC