Search
Random Recipe
Lacto Fermented Vegetables
 Lacto-Fermenation is one of the oldest food preservation methods still regularly used. It is not Witchcraft or Sorcery and it's effective tasty and pretty much bullet proof. If it tastes good, then it's good. Plus the resultant pickles have the benefit of home made probiotics. Lacto-Fermentation has nothing to do with dairy products, the lacto refers to lactic acid. All fruits and vegetables have beneficial bacteria such as Lactobacillus on the surface. In an anaerobic (oxygen-free) environment, these bacteria convert sugars into lactic acid, which inhibits harmful bacteria and acts as a preservative. It's also what gives fermented foods their characteristic sour flavour. The earliest record of fermentation dates back as far as 6000 B.C. in the Fertile Crescent -and nearly every civilization since has included at least one fermented food in its culinary heritage. From Korean kimchi and Indian chutneys to the ubiquitous sauerkraut.
On Facebook
- Details
- Written by Tony Carson
- Category: Recipes

There was a 500g pack of Turkey Thigh mince with a yellow sticker on it, it was bound to come home reall. This meal used 1/2 of it and the Peppers were free as they were destined for composting!
Ingredients:-
2 Red Peppers, halved and de-seeded
250g Turkey Thigh mince
1 Tin of chopped Tomatoes
A hearty squirt of Tomato Puree
200ml Chicken Stock
1 Onion, finely diced
2 Cloves of Garlic, minced
Salt & Pepper
Mixed Herbs
Basil
Grated Mozzarella
Oil to fry
Method:-
(1) Fry The Onion until softened and then add the Garlic.
(2) Add the minced Turkey and fry until it begins brown.
(3) Season with Salt & Pepper and add the dried Herbs.
(4) Stir in the Tomato Puree.
(5) Add the chopped Tomatoes and Chicken stock.
(6) Simmer to reduce for 30 minutes.
(7) Load the filling into the Peppers with a slotted spoon.
(8) Sprinkle the Cheese over the top and roast in the oven at 180c until it is piping hot and the Cheese has browned.
We had some chopped Collard greens so Sue fried them with a little dried Laver (Seaweed), Cumin seeds, Chinese Five Spice, Sugar, Salt and Pepper.


- Details
- Written by Tony Carson
- Category: Recipes

Back in October Sue created a Sweet & Soup sauce as we had some Pineapple juice I bought by mistake. We’re working our way through a Turkey thigh and drummer at the moment as they are often on offer just after the festive season. So we thought we’d revisit the recipe – With a few additions and improvements. Lacto Fermented Ginger worked really well, but fresh would be similar.
Ingredients for the battered Turkey:-
300g of cubed Turkey thigh
250g Self raising Flour (Gluten free in our case)
Chinese Five Spice
Turmeric
Onion Salt
Garlic Salt
Soy Sauce (Gluten free here)
Sparling Water
Method:-
(1) Marinade the Turkey cubes in Soy Sauce and Five Spice in the fridge for an hour.
(2) Mix the dry ingredients and dredge the Turkey cubes.
(3) Add sufficient Sprinkling Water to make a thick batter.
(4) Coat the Turkey in batter individually.
(5) Heat the fryer to 170c.
(6) Fry in small batches until they float and are golden brown. If you have a probe you are looking for 76c in the middle, but not much more.
(7) Drain on kitchen paper.
Ingredients for the Sweet & Sour Sauce:-
1 Onion, finely chopped
1 Red Pepper, chopped
2 Cloves of Garlic, minced
1 Thumb size piece of fresh or fermented Ginger, minced
Tomato Ketchup
Cider Vinegar
Pineapple Juice
4 Spring Onions, sliced
Chilli Flakes
Cayenne Pepper
Soy Sauce
Salt & Pepper
Oil
Method:-
(1) In a large pan or Wok fry the Onions and then add the Garlic & Ginger with the dry seasonings.
(2) Add The Red Pepper.
(3) Add the Soy Sauce, Tomato Ketchup and Vinegar.
(4) Simmer and add the Pineapple juice.
(5) Simmer for 10 to 15 minutes to reduce.
(6) Add the Spring Onions are stir in.
We served ours on a bed of Rice noodles dressed with fresh Parsley and a sprinkle of additional Spring Onion. This really had all the hallmarks of a good Chinese restaurant Sweet & Sour, without the cost and Gluten. If anything it was more authentic than the real thing! Which sounds daft, but Sweet & Soup isn’t actually an authentic Chinese dish…..
- Details
- Written by Tony Carson
- Category: Recipes
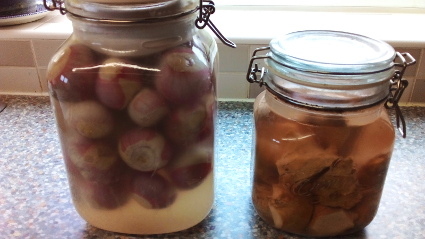
Both of these monstrosities used a 2% brine. That’s about 4 heaped table spoons of Salt to 1 litre of water. The slight pink haze is from the Ferrous Salts as I used ground Himalayan Salt. It’s not got magical properties (!!!) as some folk think, it’s just not got anti-caking ingredients which sometimes interfere with fermentation.
The Pickled Ginger was a bit of a challenge as it has natural anti-microbial properties and after a false start I had to ‘Seed’ it with a little liquid from an existing Garlic ferment. But it’s been worth the wait. If anything pickling have intensified the flavour and softened the texture. I started this on on the 29th of November, so it has been quite slow.
The Pickled Round Shallots I only started on Wednesday, so they’ve had 3 days so far. They are very active and bubbling away happily. There’s quite a lot of natural sugars in Alliums, so this will initially be a very fast ferment and eventually settle down as the Ph increases. I’m thinking perhaps 3 weeks until it goes dormant but we’ll see. The Shallots were on offer so this 1l jar will have cost us about 35p including the Salt!
- Details
- Written by Tony Carson
- Category: Recipes

Loin is one of the leanest cuts of Pork and has a bit of a tendency to dry out when roasted. But not if you stuff it! Also we’re more than happy to throw a few bits and bobs from the fridge at it if it’s wearing a yellow sticker….
Ingredients:-
Two tbsp Creme Fraiche
An Onion, finely chopped
Blue Stilton, crumbled
Garlic, minced
Mushrooms, finely sliced
Margarine
Fresh Parsley, chopped
DIY Garlic Butter (Margarine here)
Salt & Pepper
Method:-
(1) Sautee the Onion and Garlic in the Margarine until softened.
(2) Add the Mushrooms.
(3) Add the Parsley.
(4) Stir in the Creme Fraiche
(5) Season with Salt & Pepper.
(6) Simmer to reduce for 10 minutes.
(7) Put pockets in the Pork Loin.
(8) Spread the sauce in the pockets and add crumbled Blue Cheese.
(9) Rub Garlic Butter over the rind.
(10) Roast in a pre-heated oven at 180c for 40 minutes or until it’s cooked and the sauce is oozing out.
We served ours with roast Potatoes, Parsnips, Peas & Carrots, Yorkshire Puddings and lots of gravy.
- Details
- Written by Tony Carson
- Category: Recipes

Yasmin the ‘Yellow Sticker fridge’ did it again. Is naming fridges going a bit far? No, clearly not! 400G of Pork strips for 89p. I suspected this was probably shoulder so I marinated it for several hours just in case it was tough as old boots. Thankfully it wasn’t when I’d finished with it.
Ingredients:-
Pork Strips
Soy Sauce
Fish Sauce
Chilly flakes
Cornflour
Soda Water
Salt & Pepper
Method:-
(1) In a bowl pour the Soy Sauce and Fish Sauce over the Pork and fix well. Leave covered in the fridge for a couple of hours.
(2) Sprinkle Chilli flakes over the Pork and mix well.
(3) Add a little Cornflour to the marinade and stir to thicken.
(4) Add Cornflour to two bowls. One in to flour the Pork and the second is for a batter.
(5) In the batter bowl season the Cornflour with Salt and Pepper and add enough Soda Water to make a still batter.
(6) Pre-heat the fryer to 180c.
(7) Dredge the meat strips in small batches in the dry Cornflour and then better.
(8) Fry in batches until they float and are golden brown.
(9) Brain on kitchen paper before serving.
We made a stir fry to go over Rice Noodles with the crispy Pork over the top dressed with a few Chives.
Social Links
Translate
Latest Recipes
Latest News
- Why do we do what we do?
- When you find the ships cat on the helm
- We're a month old!
- Universal Credit & Employment Agencies!
- UN Report on Poverty in the UK November 2018
- The Veg Box
- The rollout of Universal Credit will be delayed until 2023
- Petition the Government to fix Universal Credit
- Honesty from a Politician? Not really, but it's a start.
- Homeless - Trapped - Homeless again - This can't be right?
© 2026 Eat Well on UC