Search
Random Recipe
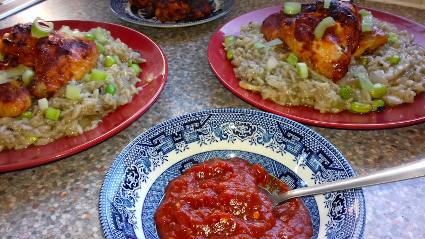
Parsi Kheema Per Eeda

Apparently this is a favoured breakfast in some areas of India. Meat and Eggs, similar in a way to a traditional English breakfast I guess? We added boiled Rice to make a main meal out of it.
Ingredients:-
500g of Minced Lamb
1 Red Onion, finely diced
a Thumbnail of Ginger, grated
5 Cloves of Garlic, chopped
2 Green Chillies, deseeded
½ a Tsp of Turmeric
½ a Tsp of Chilli Powder
2 Tomatoes, chopped
1 Tbsp of Tomato puree
200ml of Water
1 Tbsp of Spirit Vinegar
1 Tbsp of Brown Sugar
Salt & Pepper to season
4 Eggs
Oil to fry
Chopped Coriander to garnish
Method:-
(1) Add the Ginger, Garlic and one Green Chilli to 3 Tbsp of water and wuzz in a blender.
(2) You are aiming for a smooth paste.
(3) Add the Mince to a bowl along with 1 tsp of the paste.
(4) Mix well and set aside.
(5) Heat the Oil in a heavy-bottomed sauce pan, or Dutch Oven.
(6) Add the Onion and fry until softened and light brown.
(7) Add the remaining paste and stir well.
(8) Add the Mince along with the Turmeric and Chilli Powder.
(9) Cook over a medium heat and 10minutes, stirring so that the meat is evenly browned.
(10) Add the chopped Tomatoes, Tomato Puree and the remaining Green Chillies (Slit lengthways).
(11) Allow to simmer for a further 4 minutes.
(12) Season with Salt & Pepper.
(13) Add the water and bring to the boil.
(14) Reduce the heat and simmer for 15 minutes with the lid on.
(15) Stir gently half way through cooking.
(16) Add the Vinegar and Sugar and continue to simmer for 2 minutes.
(17) Break one Egg at a time into the Kheema and on a low heat cook the Eggs for 4 to 5 minutes.
(18) Cover with the lid so that the Whites set but you still have runny Yolks.
(19) Garnish with Coriander and serve.
The Vinegar and Sugar added an interesting flavour twist. Really enjoyable. Strangely we did end up eating left overs for breakfast, but that wasn’t really the plan…...
We don’t like the price of fresh minced Lamb in the local supermarkets. I ventured into the Iceland Food Warehouse and found a 1kg bag of frozen mince for £3.75. Which was much more realistic!
On Facebook
- Details
- Written by Tony Carson
- Category: Recipes
We wouldn't normally buy Chicken Wings as at £2.50 a pack it seems a lot for mostly bones. But the yellow sticker at £0.63 sent these trundling home with me to hide in the freezer!
Ingredients for the Risotto:-
100g Jasmine Rice
1 large Onion, chopped
1 Mushroom, sliced
1 Stock Cube
A palm full of Edamame Beans
1 Spring Onion, sliced
Cumin
Salt to taste
Oil
Ingredients for the Hot Sauce:-
½ a tin of chopped Tomatoes
A slug of Fish Sauce
A squeeze of Tomato Sauce
1 Tbsp Chilli flakes
1 tsp Sugar
Salt & Pepper
Ingredients for the Hot Wings:-
8 Chicken Wings
Hot Sauce (See below)
Oil
Method:-
(1) In a pan add all the ingredients for the hot sauce.
(2) Bring to the boil and then reduce the heat to a gentle simmer.
(3) Us a Potato masher to break the Tomatoes up if they look lumpy and stir occasionally.
(4) Simmer to reduce for 20 minutes then set aside.
(5) In a small pan fry the chopped Onions and sliced Mushroom gently until the Onion is softened. Set aside.
(6) Dissolve the Stock Cube in 500ml of hot water.
(7) In a large frying pan or Wok add a little Oil and dry fry the Rice and Cumin for 5 minutes
(8) Add the Stock a little at a time to the Rice and gently stir.
(9) Pre-heat the oven to 180C.
(10) Oil an oven tray and generously coat the wings in hot sauce.
(11) Add the wings to the tray and pop in the oven.
(12) When the wings are cooked and the Hot Sauce is beginning to brown a little add the fried Onion and Mushroom to the Rice and gently stir in.
(13) If the Risotto is looking too dry add a little extra hot water and Salt to taste if required.
(14) Add the Edamame Beans and half of the sliced Spring Onion and stir in.
(15) Plate the Risotto and place the Hot Wings on top and sprinkle with the remaining Spring Onion.
We reheated the remaining Hot Sauce and served to as a side.


- Details
- Written by Tony Carson
- Category: Recipes

“E” in our Vegetarian Alphabet experiment is covered by Edamame Beans.
We had a tub of the Urad Dal stuffing from this recipe in the freezer, which made a great foundation for the Burger. - http://www.eatwellonuc.org.uk/index.php/recipes/308-aubergine-baked-boats
The recipe for the Gluten free bun is also here. - http://www.eatwellonuc.org.uk/index.php/recipes/51-monster-burger
What you put in your burger is entirely up to you, but our Bean based Burger went something like this:-
Ingredients:-
Urad Dal – (Split Black Lentils)
½ tube of Tomato Puree
3 Onions, sliced
2 cloves of Garlic, minced
Mixed Herbs
Salt & Pepper
Chilli Flakes
These were the base ingredients in the stuffing from the previous recipe
250g Edamame Beans
50g Gluten free Bread crumbs
Grated Cheese
Method:-
(1) We thawed the stuffing and the Edamame Beans
(2) In a large bowl we mixed the Bean, Stuffing and Bread crumbs.
(3) Oil a square oven tray.
(4) Blend the Burger ingredients in a food processor.
(5) Press the Burger mix into the tray and flatten.
(6) Place in a pre-heated oven at 180c and cook for 20 minutes.
(7) Flip with a Fish slice and cook for a further 20 minutes.
(8) Place under the grill to brown slightly.
(9) Sprinkle with the grated Cheese and pop back under the grill until the Cheese has melted and slightly browned.
(10) Assemble your Burger.
We made crispy battered Chips and Onion rings as a side / garnish. This was actually two days worth of food for us and we had the remainder yesterday!
- Details
- Written by Tony Carson
- Category: Recipes

“D” in our Vegetarian Alphabet is Daikon a big fat Radish. Ours cost the princely sum of 80p and we made two very tasty side dishes with it.
Daikon Chips
Ingredients:-
Daikon, cut into chips
Dried Ginger
Chilli / Tomato paste
Soy Sauce
Sugar
Salt
Method:-
(1) Mix all the ingredients (apart from the Daikon) in a bowl.
(2) Coat the Daikon.
(3) Lay in a dry oven tray and roast at 180C until golden brown.
Daikon Salad
Ingredients:-
Daikon, sliced finely
Onion, sliced finely
Soy Sauce
Died Ginger
Garlic
Salt
Method:-
(1) Mix it all together and enjoy as a side!
- Details
- Written by Tony Carson
- Category: Recipes
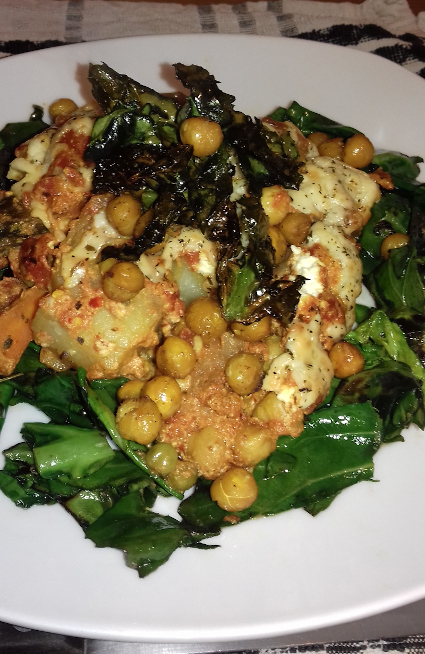
“C” in our Vegetarian Alphabet seems suitably covered with this recipe title!
As seems to be the case with these Vegetarian creations, we made far too much and will be having a second helping this evening. So a bonus cost and cooking free day sorted!
Ingredients:-
1 tin of Chickpeas, drained
1 tin chopped Tomatoes
Chilli flakes
A squirt of Tomato Puree
1 tsp Sugar
Mixed herbs
2 leaves from a Spring Green Cabbage, chopped
2 medium Potatoes
1 Carrot
1 Small Pepper
1 Onion
1 tsp Turmeric
3 Mushrooms, quartered
Grated Cheese
Oil
Method:-
(1) In a pan add the chopped Tomatoes, Chilli flakes, Tomato Puree, Sugar and mixed Herbs.
(2) Bring to the boil and then simmer for 20 minutes.
(3) Peal and roughly chop your Potatoes, Carrot, Pepper and Onion. Stand in water.
(4) Per boil your Potatoes.
(5) Add your Chickpeas and Turmeric to water in a pan and simmer for 5 minutes. Then drain.
(6) Preheat the oven to 180C.
(7) In a baking tray mix your vegetables and most of the Chickpeas, keep a handful back for a garnish.
(8) Place the tray in the oven for 20 minutes.
(9) Lightly fry most of the Cabbage leaves in a little Oil, keeping ¼ back for a garnish.
(10) After 20 minutes stir the Mushroom into your tray back, pour the Tomato Chilli sauce over and sprinkle with the grated Cheese.
(11) Return to the oven for a further 10 minutes or until the Cheese has melted and slightly browned.
(12) In a deep fat fryer fry the remaining Cabbage leave and Chickpeas until they are crispy.
(13) Form a circle of fried Cabbage leave from the frying pan on your plates.
(14) Spoon the Bake into this circle.
(15) Garnish with the deep fried Cabbage and Chickpeas.
We had a home made Garlic Bread as a side. Again for a pair of Omnivorous creatures this was a very tasty and filling meal.
- Details
- Written by Tony Carson
- Category: Recipes

Well there was the Chilli injected Scotch Egg experiment a while ago. Clearly Sage & Onion Stuffing Balls need “improvement” Either that or we’ve a bit too much time on our hands!
The Cheese we used was actually home made Sage and Garlic Roule, but shop bought will do the trick. Or even Mozzarella….
For the Bread component we used a couple of Gluten free Thins which had been loitering in the freezer. But sliced Gluten free bread works just a well.
Ingredients:-
Fresh Sage, finely chopped
1 Onion, finely chopped
Bread, reduced to crumbs in a food wuzzer
1 Egg, whisked
Cheese
Margarine
Salt & Pepper
Method:-
(1) Combine everything except the Cheese. Use enough Margarine so that you will be able to form your Stuffing into ball which will not fall apart.
(2) Form your Stuffing into balls.
(3) Rub a little Margarine over a baking tray so that your Stuffing Balls won’t stick.
(4) Add your Stuffing Balls to the tray and place in the fridge to harden for 15 minutes.
(5) Press your thumb into the centre of each Stuffing ball and press a piece of Cheese into the middle.
(6) Roll in your hands to close the Cheese in.
(7) Roast in the oven for 20 minutes at 180C.
The Cheese should soften slightly but if you are using a melting Cheese don’t cook for too long or the Cheese will run out.
Social Links
Translate
Latest Recipes
Latest News
- Why do we do what we do?
- When you find the ships cat on the helm
- We're a month old!
- Universal Credit & Employment Agencies!
- UN Report on Poverty in the UK November 2018
- The Veg Box
- The rollout of Universal Credit will be delayed until 2023
- Petition the Government to fix Universal Credit
- Honesty from a Politician? Not really, but it's a start.
- Homeless - Trapped - Homeless again - This can't be right?
© 2025 Eat Well on UC