Search
Random Recipe
Keema Cottage Pie

We had a small pack of mince Beef (300g) with a yellow sticker, so Sue decided to make a variation on the Cottage Pie theme. Traditional Cottage Pie meets The Eat Indian Trading Co.!!!!!!
Filling Ingredients:-
1 Onion, finely diced
½ Tsp of Turmeric
2 Tsp of Garam Masala
1 Tsp of Cumin Seeds
2 TSP of fresh Ginger, minced
2 Cloves of Garlic, minced
1 Tsp of Chilli Flakes
1 Tsp of Ground Coriander
300g of lean Beef mince
1 Tin of chopped Tomatoes
100g of Frozen Peas
1 Large Carrot, finely sliced
400g of Beef Stock
1 Tbsp of Tomato Puree
Oil to fry
For the topping
Ingredients:-
4 Medium Potatoes, peeled of cubed
A dash of Milk
A knob of Butter
1 Egg yoke
1 Tsp of Turmeric
Salt and Pepper to season
Method:-
(1) In a little Oil fry the Onion and Garlic until the Onion is translucent.
(2) Add all the spices.
(3) Add minced Beef and fry until it is browned.
(4) Stir in the Tomato Puree, tinned Tomatoes and Stock.
(5) Allow to simmer for 20 minutes to reduce.
(6) Add the frozen Peas and stir in.
(7) Boil and mask the Potatoes.
(8) Add the Milk, Butter and Turmeric and combine.
(9) Stir in the Egg Yoke.
(10) Spoon the filling mix into oven proof dishes and add the Potato mix to the top.
(11) Place in a preheated oven at 180c and cook for 20 minutes until the Potato has browned on the top.
We served the excess filling on the side and dressed with a bit of fresh Parsley. It might not look pretty, but it tasted really good!
On Facebook
- Details
- Written by Tony Carson
- Category: Recipes

Our second “Vegetarian Alphabet” recipe. This was quite a long process. But very tasty….
Ingredients:-
100g Rosecoco Beans
2 Fresh Beetroots including their tops
2 Medium Potatoes
Bryndza Cheese ( We made this ourselves – Feta will replace this )
2 Small Onions
½ a Yellow and ½ a Red Pepper
Fresh Rosemary
Dried Rosemary
Mixed Herbs
2 leaves of Winder Green Cabbage
Turmeric
Chilli Flakes
Salt & Pepper
Spirit Vinegar
Halved Cherry Tomatoes
Oil
Method:-
(1) Soak the Beans for at least 5 hours.
(2) Cut the greens off the Beetroots, leave a inch or so attached.
(3) Sprinkle with Vinegar, lay on fresh Rosemary and drizzle with Oil. Keep the greens.
(3) Roast them for 40 minutes at 180c and then set aside to cool.
(4) Drain the Beans and add to a pan of fresh water with a little Turmeric.
(5) Bring to the boil and then simmer for 40 minutes.
(6) Drain the Beans and set aside.
(7) When cool enough to handle peel the Beetroot and cut into chunks.
(8) Peel and dice the Potatoes and pre boil in salted water for 5 minutes.
(9) Drain and add little salt, a dash or Oil and mixed Herbs. Set aside to cool.
(10) Skin and chop the Onions and Peppers, arrange on a baking tray and drizzle with Oil and sprinkle with dried Rosemary.
(11) Add the Beetroot and stir together.
(12) Place in the oven on the middle shelf at 180c.
(13) Place the Beans on a baking tray at the bottom of the oven.
(14) Grill the Cheese the Cherry Tomatoes.
(15) Chop the Cabbage leaves and Beetroot stems and stir fry with a little Salt & Pepper.
(16) Fry the diced Potatoes until crispy. These can be served as a side once dried on kitchen paper.
(17) Sprinkle the roasted Bean with Chilli flakes and then place under the grill so they pop.
(18) Bring everything together on a plate and dress with the Cheese and grilled Tomatoes.
We fried some Beetroot discs as crisps for a side to go with the cubed Potatoes. This is certain not a recipe for a quick turn-around. But it was really tasty.


- Details
- Written by Tony Carson
- Category: Recipes
Sue’s daughter Claire bought her a Cheese making kit for Mothers Day. As we were plunged into Lock Down and we love messing about in the kitchen this turned out to be the best gift possible. Or first completed Cheese was the cornerstone of last nights meal and it was really good.
Our only alteration next time we do this recipe will be to use slightly less Salt in the drying stage and just give it a bit more time.
- Details
- Written by Tony Carson
- Category: Recipes
Well I guess we're all in the same boat? We've a reasonable amount of dried foods, plenty in freezer, but we've forgotten some bits and bobs. So we've had to swap a few ingredients.
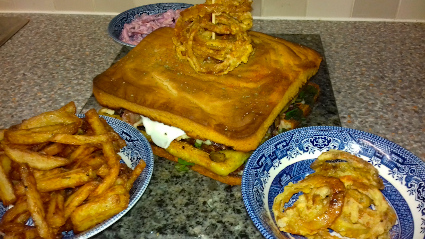
(1) No Lettuce? Use the greens from the top on a bunch of Beetroot!
(2) We don't have much salad in all all and can't get any, so use 4 Potato Waffles to add bulk!
A bowl of thin hand cut fries, some homemade red Cabbage & Celeriac Coleslaw and homemade Onion rings. It might not have been the healthiest meal, but it tasted gooood!
- Details
- Written by Tony Carson
- Category: Recipes

We like to set ourselves little challenges. We’ve done the “Ingredients Alphabet”, “Around the World” etc. So this time we’re going to jump on the Vegetarian gig and do a “Vegetarian Alphabet”
Aubergine for “A” works.
We;re not into the “Fake Meat” concept so the Urad Dal which we bought from the local Continental shop added the Meaty texture.
Ingredients:-
Urad Dal – (Split Black Lentils)
½ tube of Tomato Puree
1 Aubergine halved and scooped out. (Save the flesh)
3 Onions, sliced
2 cloves of Garlic, minced
Mixed Herbs
Salt & Pepper
Chilli Flakes
Mushrooms, sliced
Grated Cheese
Cherry Tomatoes
Oil
Method:-
(1) Add the Tomato Puree to a little water in a saucepan and bring the Urad Dal to the boil. Reduce the heat, season with Salt and Pepper and simmer for a good hour. Add extra water as required as they are very thirsty little dudes.
(2) When the Urad Dal has expanded and softened take them off the heat.
(3) In a frying pan fry the Onions until translucent.
(4) Add the Mushrooms and fry for a further 5 minutes on a low heat.
(5) Cut the Aubergine lengthways, scoop most of the flesh out and Oil.
(6) Place in the oven at 180c and roast for 30 minutes.
(7) Add the Aubergine flesh, Urad Dal and all the other ingredients excluding the grated Cheese and halved Cherry Tomatoes to the frying pan and fry gently stirring occasionally.
(8) Remove the Aubergine halves from the oven and stuff with your filling.
(9) Heat the grill.
(10) Dress with the Cherry Tomatoes and grated Cheese and place under the grill.
(11) When the Cheese has melted you’re good to go.
We served ours with Chips and Peas. It was really very tasty and filling.
- Details
- Written by Tony Carson
- Category: Recipes
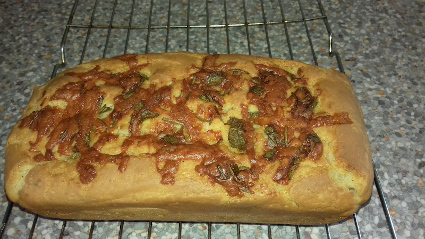
Folk have been raiding the Gluten free bread. So I thought I'd have a pop at a Ciabatta with a slightly modified version of Sue Burger Bun recipe. To be honest we were quite impressed.
Ingredients:-
240g Self Raising Gluten free flour
½ tsp Salt
200g Grated Cheese
The chopped leaves from 2 sprigs of fresh Rosemary and Sage
240ml Milk
4 tbsp Mayonnaise
3 tbsp Margarine
A little Butter
Method:-
(1) Gently heat the Butter and ½ of the Rosemary & Sage.
(2) Set aside to cool.
(3) Mix everything else.
(4) Heat the Margarine with the remaining herbs and Cheese.
(5) Spoon everything into a bread tin.
(6) Pre Heat the oven to 180c
(7) Add the grated Cheese and Herbs to the top.
(8) Bung in the oven for 45 Minutes.
Cool on tray and use as sliced Ciabatta.
Social Links
Translate
Latest Recipes
Latest News
- Why do we do what we do?
- When you find the ships cat on the helm
- We're a month old!
- Universal Credit & Employment Agencies!
- UN Report on Poverty in the UK November 2018
- The Veg Box
- The rollout of Universal Credit will be delayed until 2023
- Petition the Government to fix Universal Credit
- Honesty from a Politician? Not really, but it's a start.
- Homeless - Trapped - Homeless again - This can't be right?
© 2025 Eat Well on UC